 Ask AI
Cloudinary Chrome Extension (Beta)
Last updated: Aug-24-2026
Overview
The Cloudinary Chrome Extension enables you to insert Cloudinary image and video asset URLs directly into web form fields without leaving your current page. It's designed for users who frequently work with Cloudinary assets in external tools and platforms.
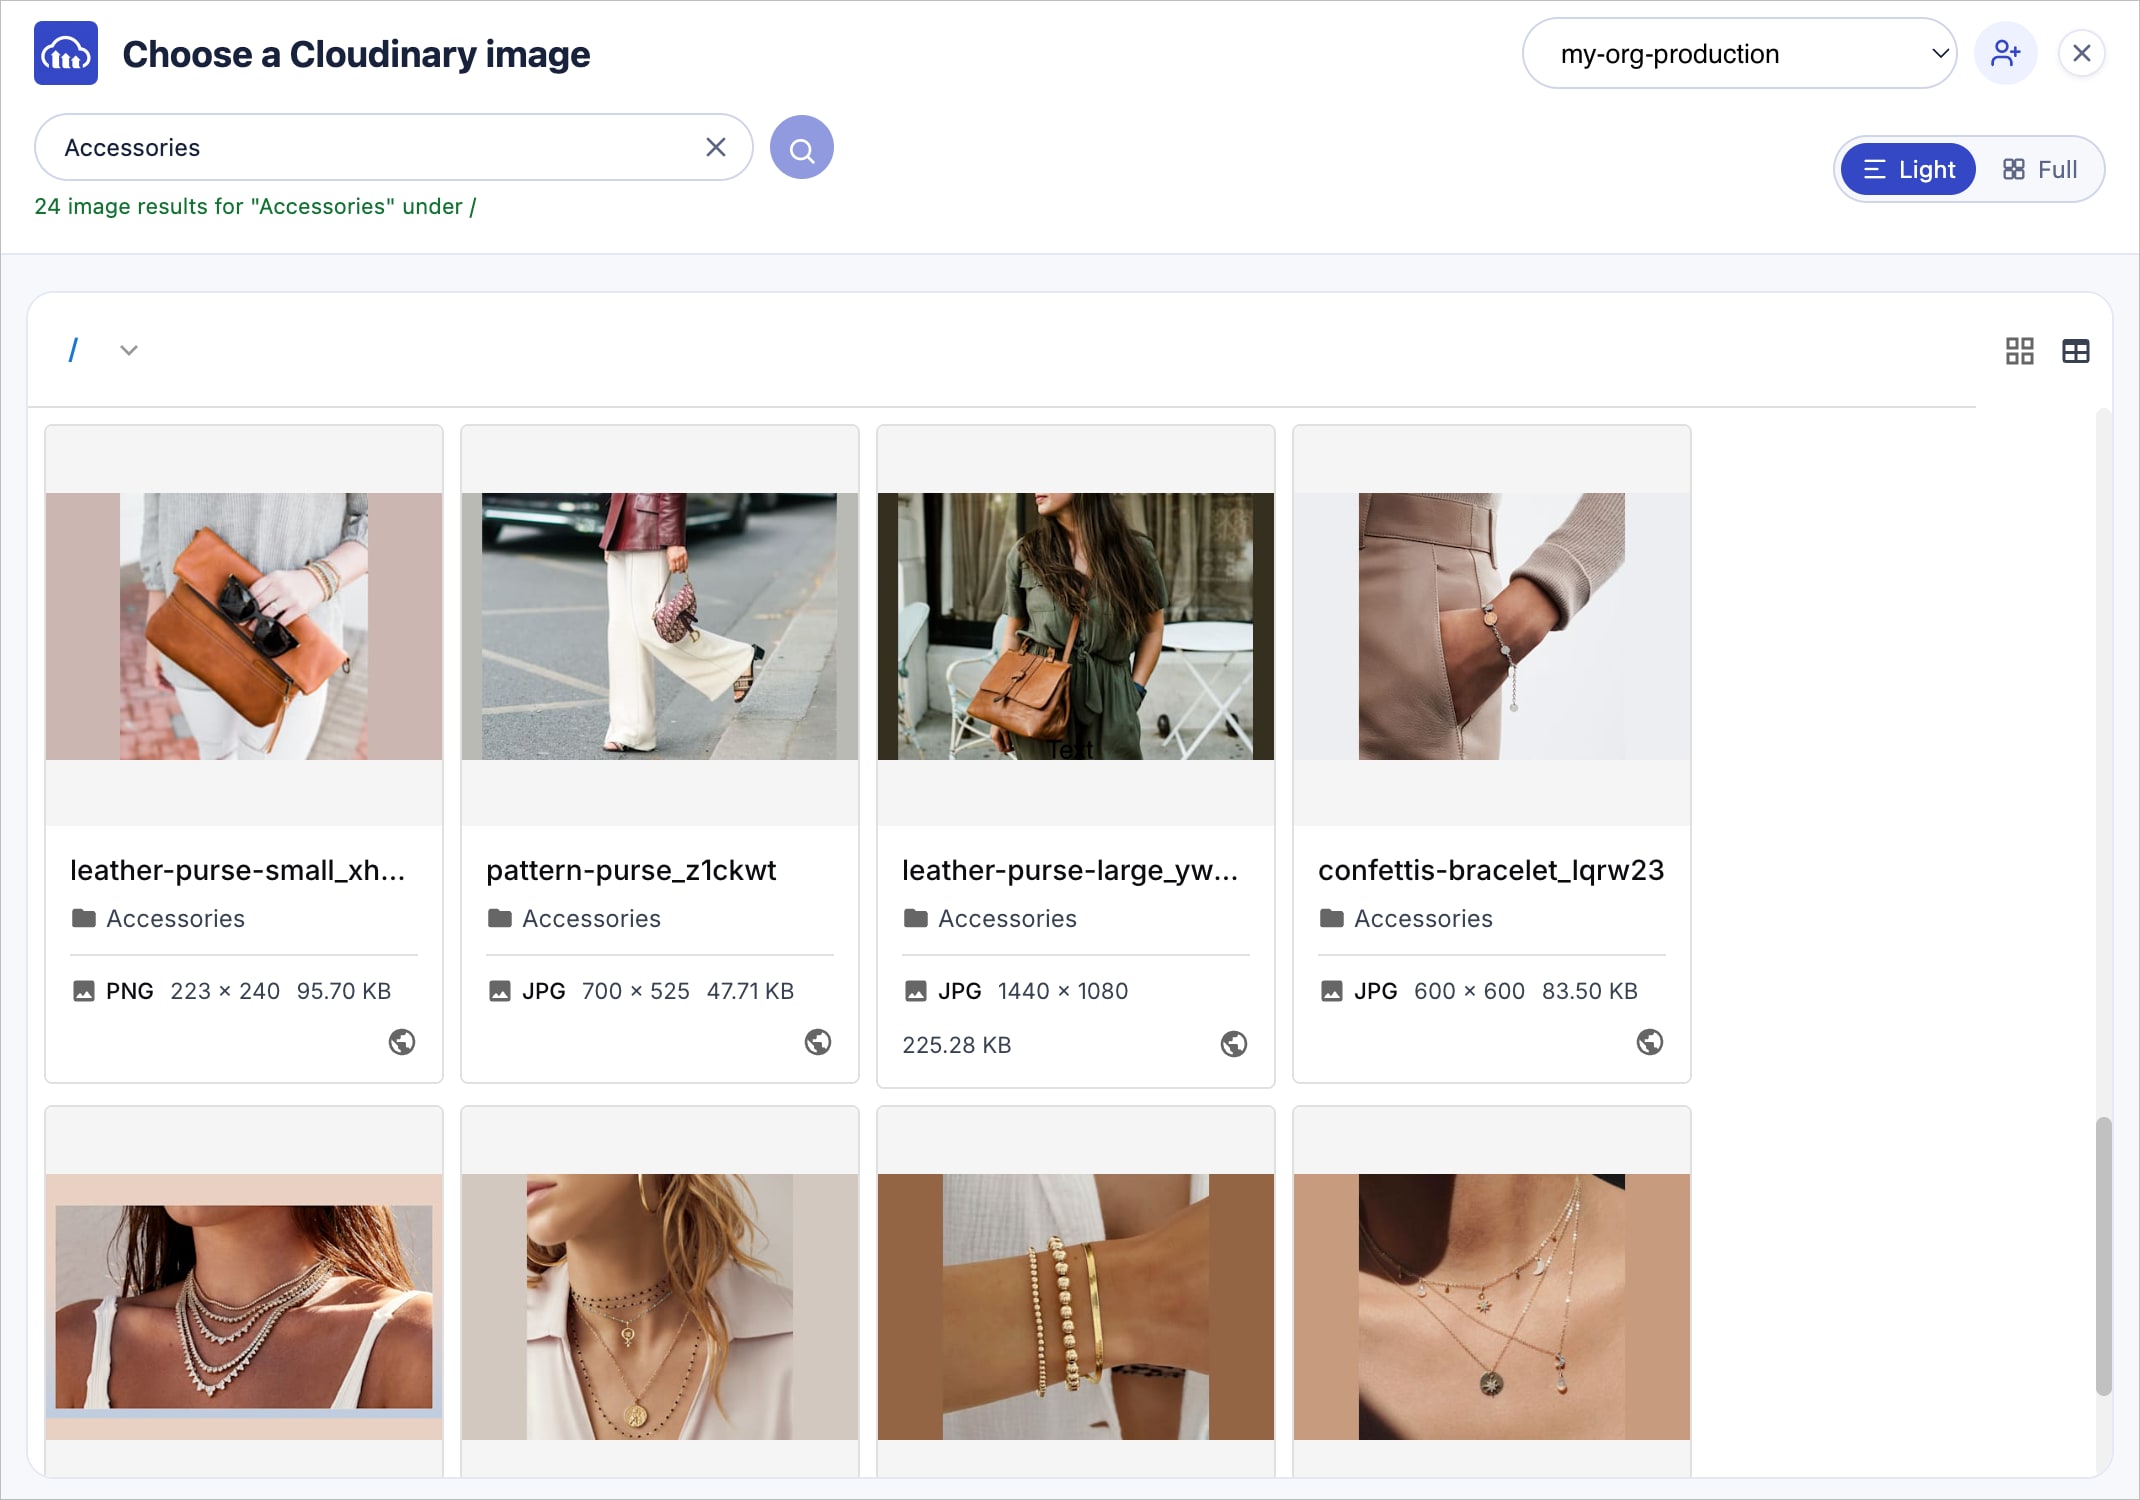
What it does:
- Insert Cloudinary image and video asset URLs directly into web form fields
- Browse and search your Cloudinary Media Library from any web page
- Preview assets inline before inserting them
- Generate optimized Cloudinary delivery URLs automatically
- Apply transformation templates to use asset variations that comply with company standards
- Automatically detect relevant image and video URL fields
- Access multiple product environments within your account
Who should use it:
This extension is for anyone who wants to use Cloudinary directly from Chrome. For example, content managers, e-commerce teams, and marketing professionals can use Cloudinary assets in external platforms like Klaviyo, Braze, page builders, CMS tools, and other web-based editors.
Install the extension
- Visit the Cloudinary Chrome Extension on the Chrome Web Store.
- Click Add to Chrome.
- Review the permissions and click Add extension.
The Cloudinary icon appears in your Chrome toolbar.
Basic workflow
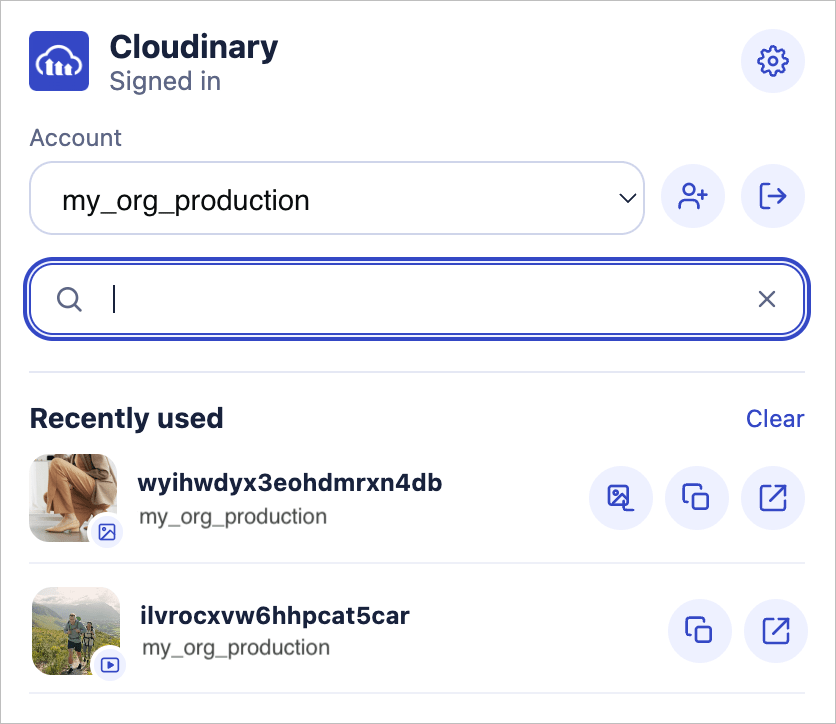
- Open the extension: Click the Cloudinary icon in your Chrome toolbar.
- Sign in: Enter your Cloudinary credentials if you haven't already.
-
Select a product environment: Select the product environment you want to work with.NoteA product environment is a separate workspace within your Cloudinary account, with its own assets and configuration. Free accounts have a single product environment, while paid plans can create and manage multiple product environments. For more information, see Product environment in the glossary.
-
Select a recently used asset or search for one: If you recently selected assets, they appear in the extension dropdown for your selection. You can also enter a search term to find an asset; results display as thumbnails.TipIf you've configured Cloudinary image or video URL fields, you can search for and insert assets directly from those fields instead. For more information, see Add images and videos in a field.
- Insert an asset: Click Copy Image or Copy URL, then paste the image or the delivery URL into the desired field.
-
Open the asset in Cloudinary: Optionally, open the asset in Cloudinary for further management.TipClick the Cloudinary logo at the top of the extension dropdown to open the selected product environment's Media Library in the Cloudinary Console.
Configure Cloudinary image and video URL fields
The extension automatically detects common image and video URL fields in:
- E-commerce platforms (product images, video URLs)
- Email marketing tools (banner images, template assets)
- Page builders and CMS systems
- Marketing automation platforms
- Custom web forms with standard input fields
Mark fields as Cloudinary image and video URL fields so they display the Cloudinary icon, making it easy for users to insert and transform assets without leaving the page. This saves time by eliminating copying and pasting URLs and switching between tabs.
To set a field as a Cloudinary image or video URL field:
- Open the extension: Click the Cloudinary icon in your Chrome toolbar.
-
Open Settings: Click the settings icon at the top right of the extension dropdown.

-
Set field options: In the Settings section:
- Make sure Automatically detect image and video URL fields is selected.
- Optionally, limit detection to specific domains in Only detect fields on these domains. If you don't add any domains, fields on all domains are detected.
- Select Always show previews below Cloudinary URL fields to see previews and enable the option to apply transformation templates by default whenever you select an image or video in a field.
- Select Show image and video editing tools to enable editing the images and videos you add. This is useful if you want to create your own variations of the original. Regardless of this setting, you can select pre-made transformation templates to display variations already set in the Media Library.
-
Set the field as a Cloudinary image or video field: Right-click the field, hover over the Cloudinary icon, and select Use Cloudinary on this field. A Cloudinary icon displays in the field, enabling you to add an image or video with a click.


To remove Cloudinary from the fields in a website:
Right-click the field, hover over the Cloudinary icon, and select Don't auto-detect on this website.
To remove Cloudinary from a single field:
Click the Cloudinary icon in the field and select Don't use Cloudinary on this field.

Add images and videos in a field
Add images and videos to Cloudinary-enabled fields, and optionally apply edits and transformations.
To add an image or video to a field:
- Open the Media Library picker: Click the Cloudinary icon in the field.
- Insert an asset into the field: Scroll or search for the asset you want, then click it to insert it into the field.
Basic actions
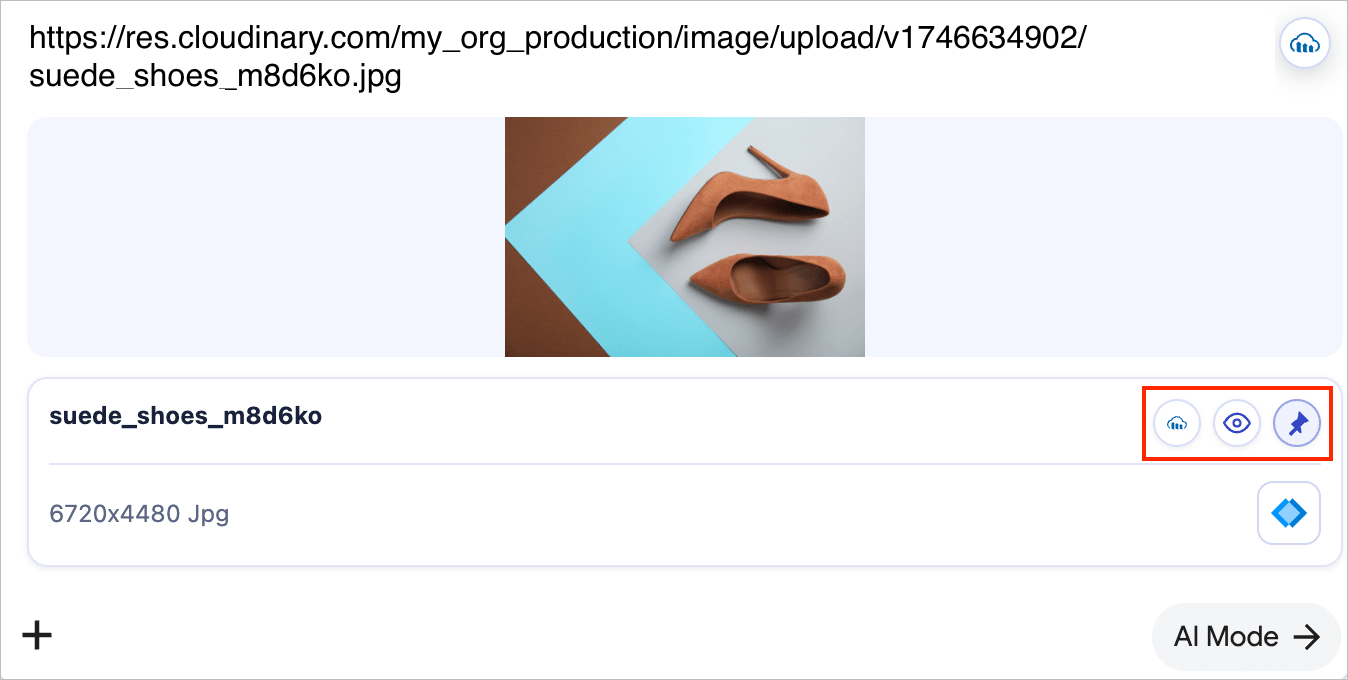
You can perform the following basic actions on Cloudinary fields that contain assets. If you've selected the Always show previews below Cloudinary URL fields, you'll always see these options. Otherwise, hover over the delivery URL to display them.
- Click the pin icon to toggle between preview (always see the asset preview and additional options) and hover (only see the preview and options when hovering over the URL). The option to apply transformation templates is only available in preview.
- Replace the asset: Click the Cloudinary icon and select Pick a video or Pick an image.
- Move the Cloudinary button to the right or left of the field: Click the Cloudinary icon and select the Move button... option.
- Open the asset in a new browser tab: Click the eye icon.
Apply transformation templates to a field
You can apply a pre-defined transformation template to an image or video field. The template is retained as a field setting and added to the delivery URL of the asset inserted into the field. If you insert a different asset into the field, the same transformation is automatically applied to its delivery URL.
- Maintain consistent image sizing across platforms
- Apply brand-specific filters or effects automatically
- Generate responsive images without manual resizing
Transformation templates are available only on sites that support them, such as Braze and Klaviyo.
To apply a transformation template to a field:
- Make sure you're in preview.
- Click the transformation template icon.
- Select a transformation template from the list.
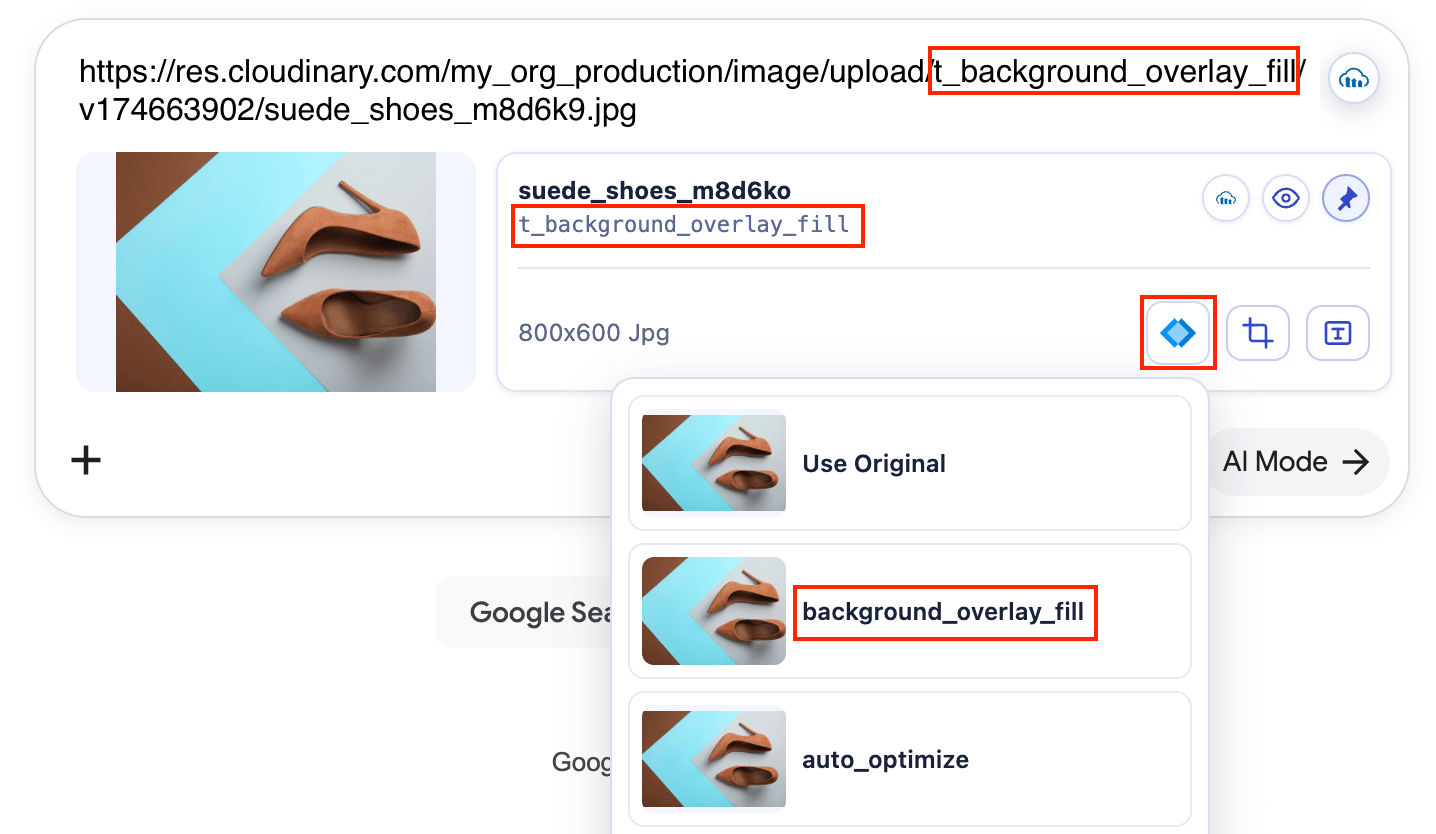
The asset is inserted into the field with the named transformation associated with the selected template added to its delivery URL. The named transformation is also displayed under the asset name. For example, t_background_overlay_fill appears in the following delivery URL:
https://res.cloudinary.com/my_org_production/image/upload/t_background_overlay_fill/v1746634902/suede_shoes_m8d6ko.jpg
To remove the transformation template from a field:
- Make sure you're in preview.
- Click the transformation template icon.
- Select Use Original from the transformation options.
Image and video edit options
If the Show image and video editing tools setting is on, you can edit your image or video by applying transformations.
 Preview
 Hover
Hover
- To manually crop the image or video, click the crop icon
 :
:

- To add a text overlay, click the overlay icon
 :
:

The delivery URL shows the added transformation, and the transformation string is displayed below the image, for example c_crop,g_auto,w_700,h_700 in the delivery URL https://res.cloudinary.com/my_org/image/upload/c_crop,g_auto,w_700,h_700/image.jpg.
Additional video edit options
Videos also have their own edit options:
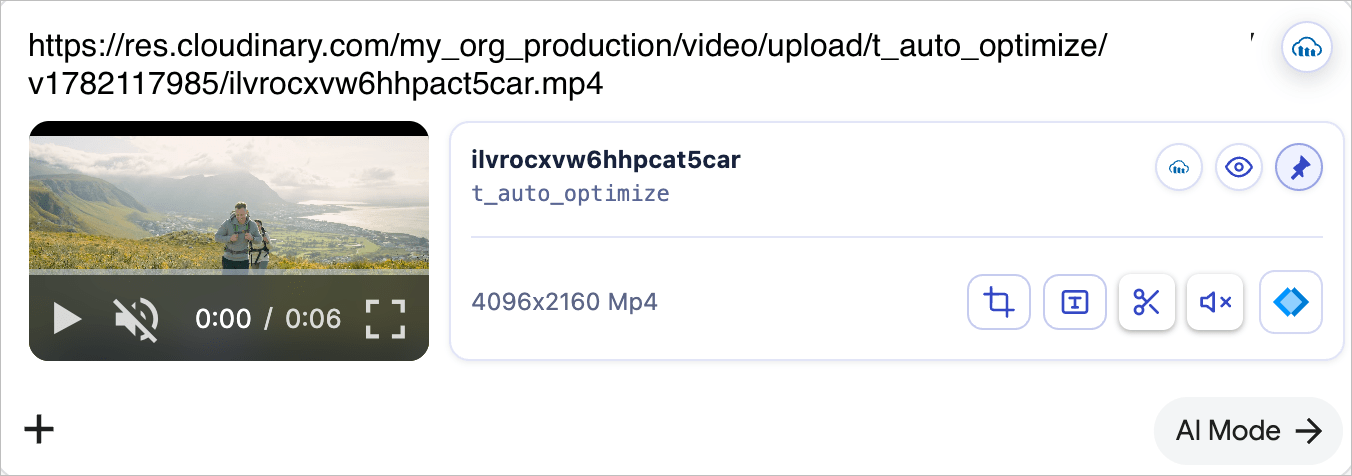 Preview
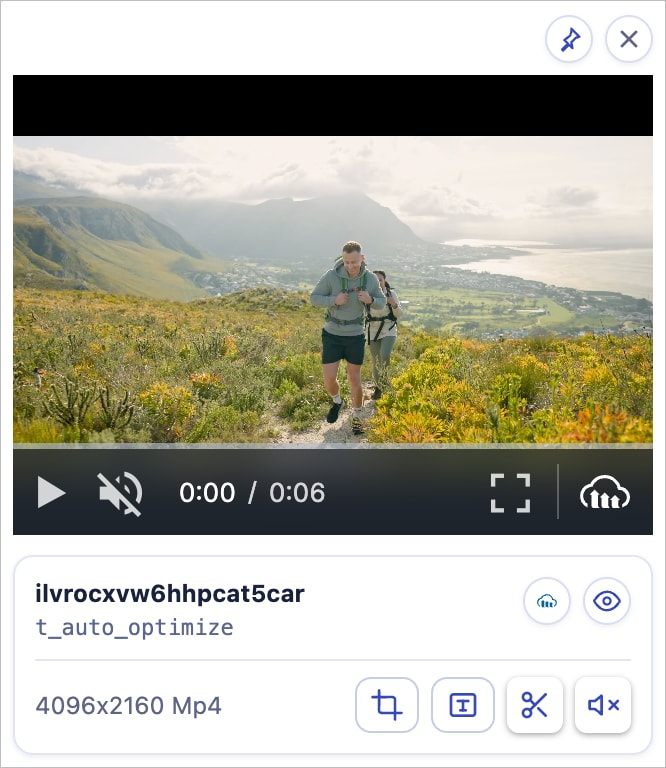 Hover
Hover
- To manually trim the video, click the trim icon
 .
.
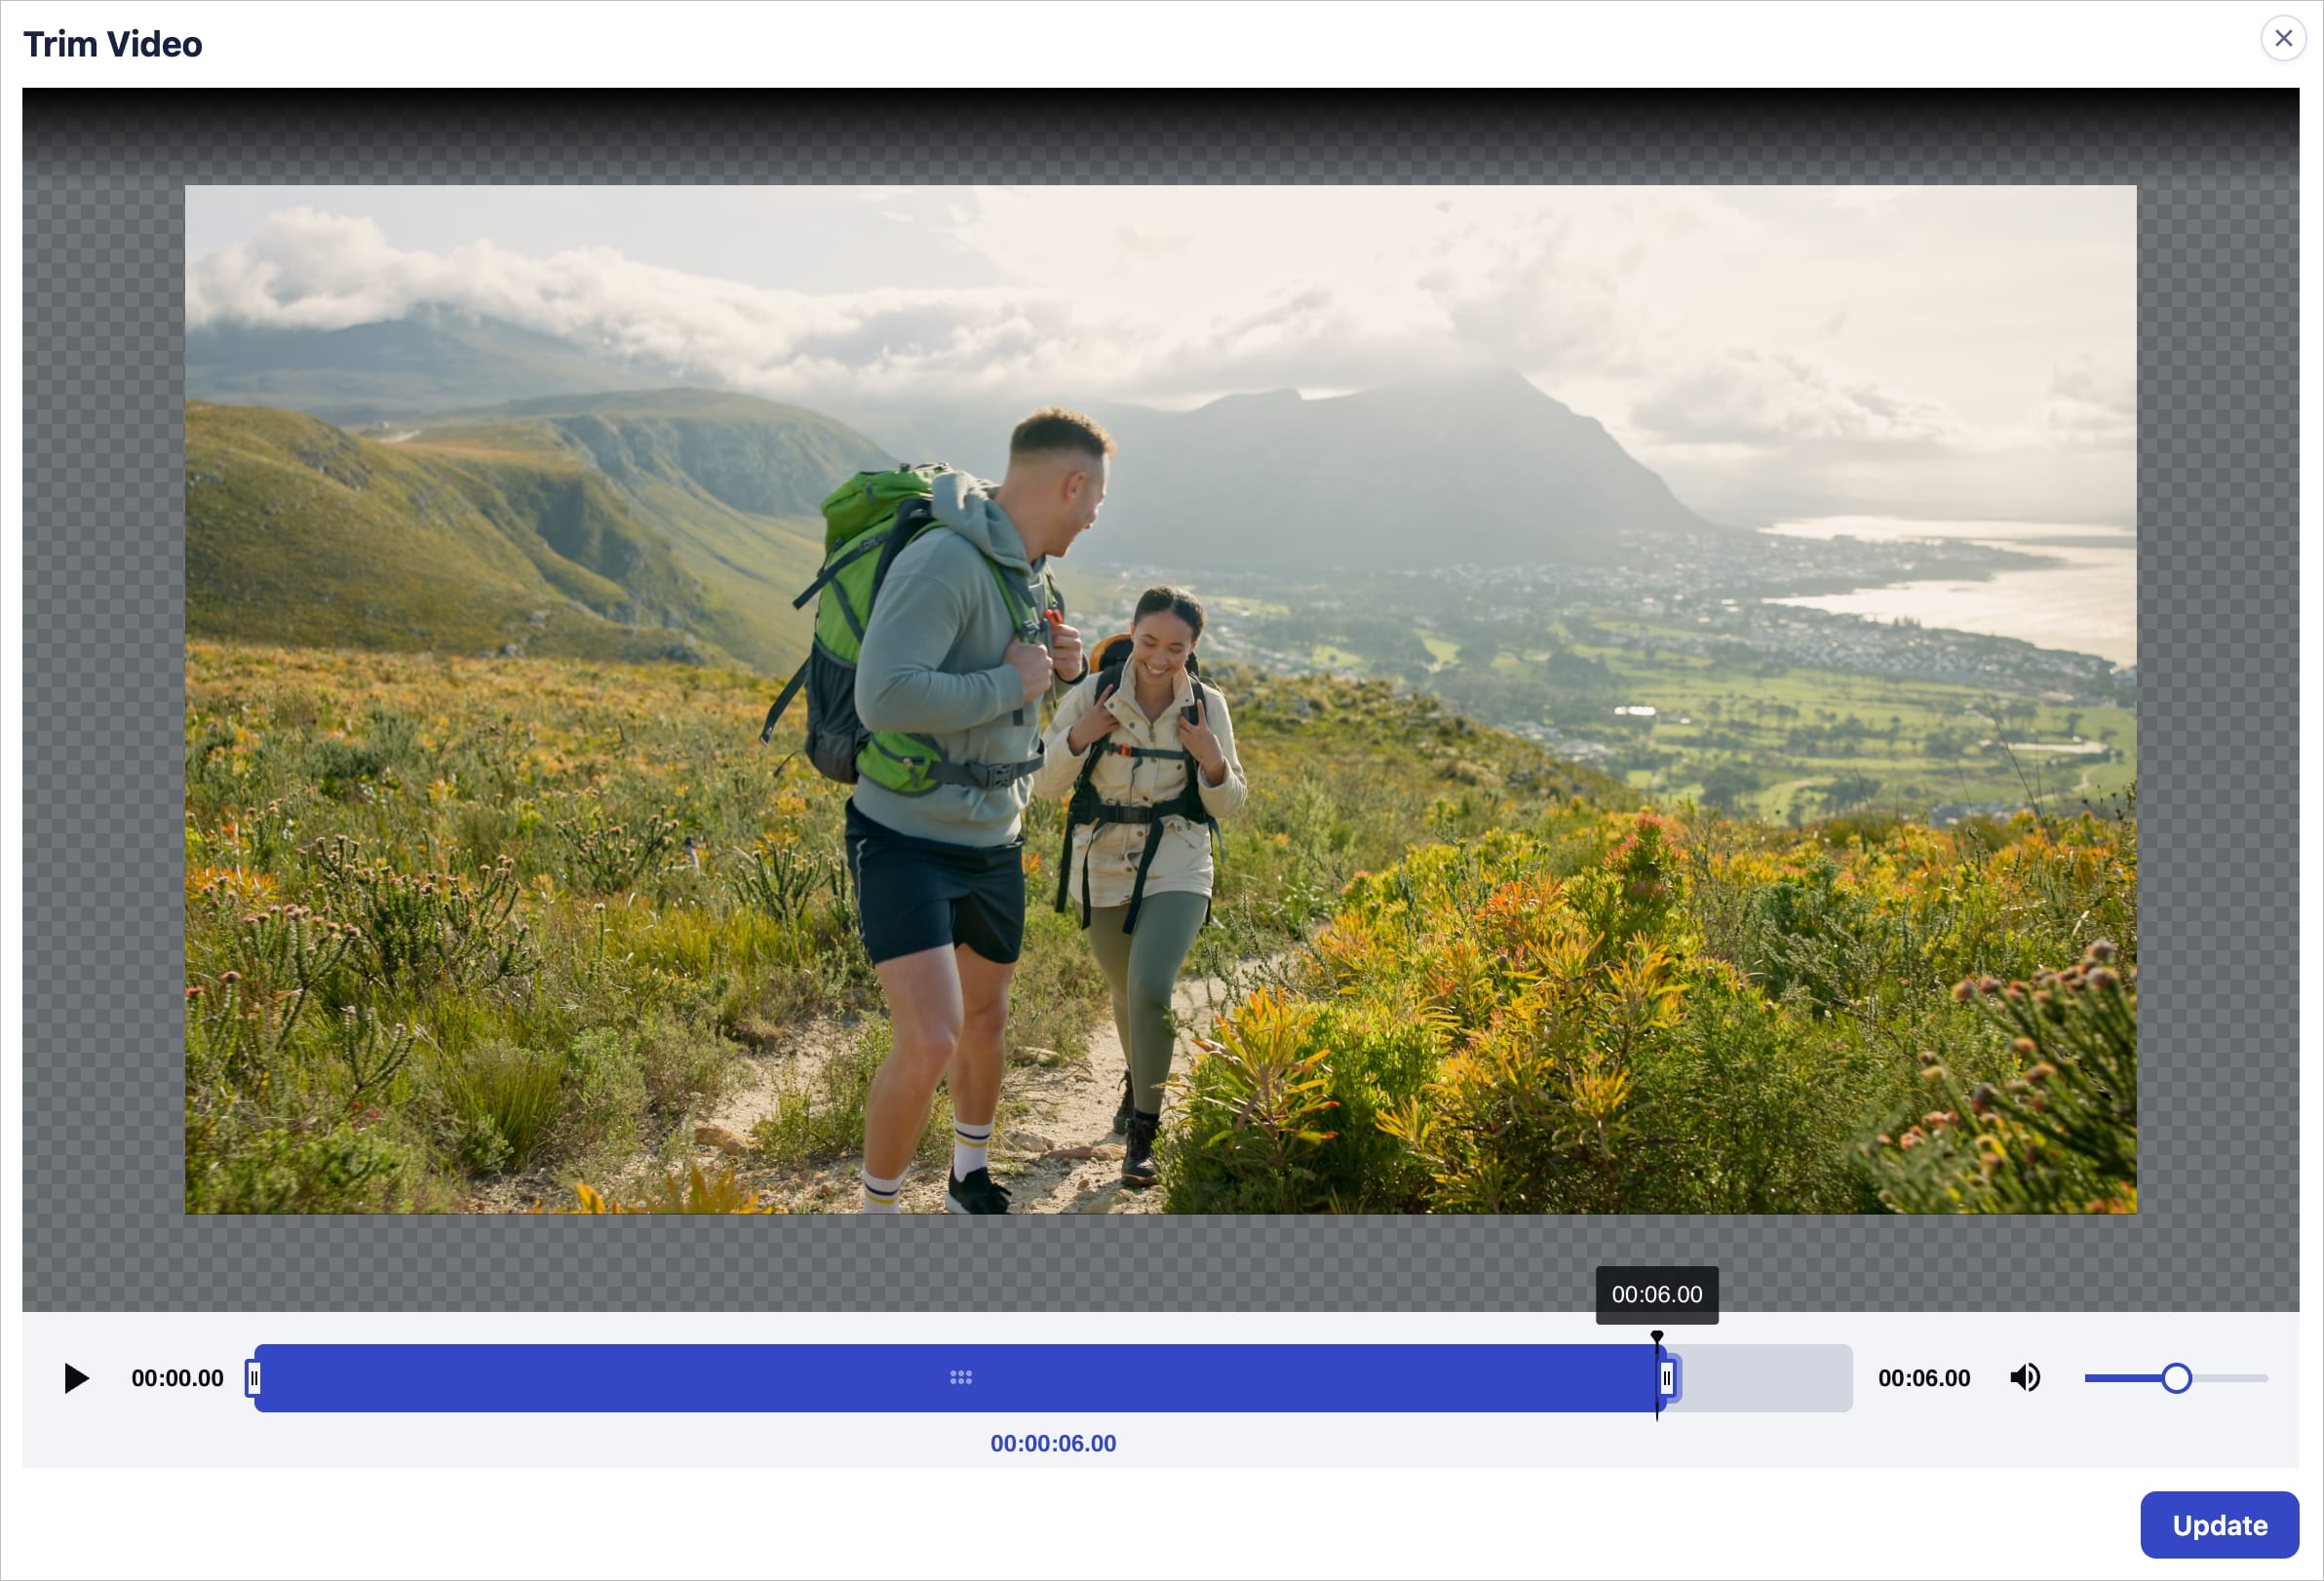
- Click the mute icon to mute the video
 .
.
The video preview and preview on hover show the applied transformations, for example c_crop,w_3000,h_2000,x_700,eo_5 to crop the video to a width of 3000px and height of 2000px, move the focal point 700 pixels to the right, and end the video 5 seconds in:

Link fields to fill automatically
You can link fields to a main asset field so they're filled automatically when you insert an image or video. For example, a Webflow CMS item might have a main field for the asset's delivery URL and linked fields for its alt text and other metadata. When you insert an asset into the main field, the extension fills the linked fields with values from the same asset.
You can fill linked fields with different asset values, including:
- Entire asset (JSON): A JSON object describing the asset, including its ID, public ID, delivery URL, dimensions, tags, and structured metadata.
- Asset ID or Public ID: The asset's identifier in Cloudinary.
- Display name: The asset's display name.
- A structured metadata field: The value of any structured metadata field defined in Cloudinary, such as the value of the
alt_textfield. - Delivery variant: The asset's delivery URL with a named transformation of your choice applied, for example a thumbnail or brand crop.
To link a field:
- Make sure both the main field and the field you want to fill automatically show the Cloudinary button.
- Click the Cloudinary button in the field you want to fill automatically.
- Select Fill when an asset is picked.
- If more than one field can act as the main field, select the field to link to.
- Select the asset value to use. Structured metadata fields are listed by name after you sign in.
The Cloudinary button on the linked field changes to a link icon. When you insert an image or video into the main field, the linked field is automatically filled with the value you selected.
- Linked fields are read-only while they're linked, so their values remain consistent with the asset inserted into the main field.
- Linked field values reflect the asset when it's inserted. If the asset's metadata later changes in Cloudinary, the values aren't updated automatically. Insert the asset again to refresh them.
To change or remove a field link:
- Click the link icon in the linked field.
- Change or remove the field link:
- To change the value used to fill the field, select Fill when an asset is picked > Change, then select a different value.
- To unlink the field, select Stop filling this field. The field becomes editable again.
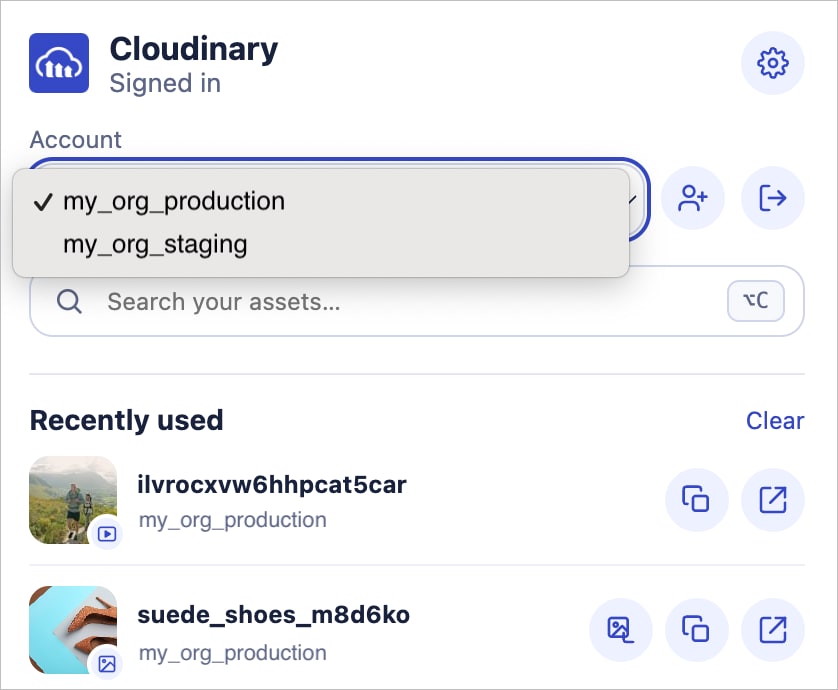
Manage multiple product environments
Companies use multiple product environments to keep assets and their management separate, for example, for different websites or apps, or for development, staging, and production.
You can use the extension with multiple product environments at once. To quickly add a product environment, click Add account in the extension dropdown. Alternatively, add it through the settings.
To add a product environment through the settings:
- Open the extension: Click the Cloudinary icon in your Chrome toolbar.
- Open Settings: Click the settings icon at the top right of the extension dropdown.
-
Add product environments: In the Account section, click Add account. Log in to your account and select the product environment you want to add.

- Set as default: Optionally, select a different product environment as the default.

In the extension dropdown, switch between product environments to select the assets you want.
Advanced settings
The Advanced settings section of the Chrome Extension Settings lets you customize how the extension behaves, including the asset picker, automatic field detection, and compatibility with the legacy extension.
Full Media Library widget
To access the Media Library widget, a compact version of your Cloudinary Media Library, directly from within your user interface, select Full Cloudinary Assets from Picker mode in the Advanced settings section. This way, you can fully manage your assets without switching context.

Exclude sites
In the Disabled sites section of the Settings, optionally specify sites where you never want to show the Cloudinary field icon automatically.
Use the legacy Chrome Extension
Configure the legacy Chrome Extension in the v1 extension settings section of the Settings page. For more information, see Cloudinary Chrome Extension (Legacy).
Use cases
Standardized product imagery
Set the image and video fields of your shopping platform's admin interface as Cloudinary fields once, and from then on your whole team inserts product media with a single click. Every inserted URL is optimized for fast loading and proper display on mobile and desktop.
On-brand marketing assets
Apply transformation templates when adding campaign images and videos to email templates, so every asset complies with the sizing and branding your team approved in the Media Library, without switching between tabs.
Asset variations without a designer
Use the built-in editing tools to crop images, trim videos, or add text overlays as you insert them, creating one-off variations of approved assets for different audiences directly in your marketing platform.
Troubleshooting
The extension doesn't detect URL fields
The extension looks for common HTML input field patterns. If your platform uses custom field names or nested fields, you may need to manually click in the field before using the extension.
Permission error appears
Ensure you're signed in with the correct Cloudinary account credentials. If the error persists, try signing out and signing back in through the extension settings.
You don't see the assets you expect
If you're signed in with multiple accounts or product environments, make sure the right one is selected in the extension dropdown. Each account maintains its own login session.
Error
Rate this page:
